
Introduction: Why Proper Bandaging Matters
A small cut or scrape seems minor, but proper care is essential to prevent infection and promote healing. This involves selecting the right dressing and mastering the correct technique for applying non woven bandage. The non-woven material is a staple in modern wound care, preferred for its softness and breathability.
At Favourite Fab, we manufacture high-quality non woven fabric bandage products. We believe that everyone should know the correct first aid bandage application techniques. Therefore, we provide this comprehensive guide on how to apply non woven bandage. This establishes our expertise and ensures you trust our products for your wound care bandage needs.
Understanding Your Dressing: The Non Woven Fabric Bandage
Before we dive into the steps, it is helpful to know what you are using. A non woven fabric bandage is superior to traditional gauze. Most importantly, it is made from bonded fibers, not woven threads.
Key Benefits of Non Woven Bandages
- Breathability: The structure of the fabric makes it a breathable non woven bandage. Because it allows air to reach the wound, it supports a healthier healing environment.
- Gentleness: It is often ideal for non woven bandage for sensitive skin. The material is soft and the adhesives used are usually hypoallergenic.
- Conformability: The material is very flexible, making applying non woven bandage easy over joints or curved areas.
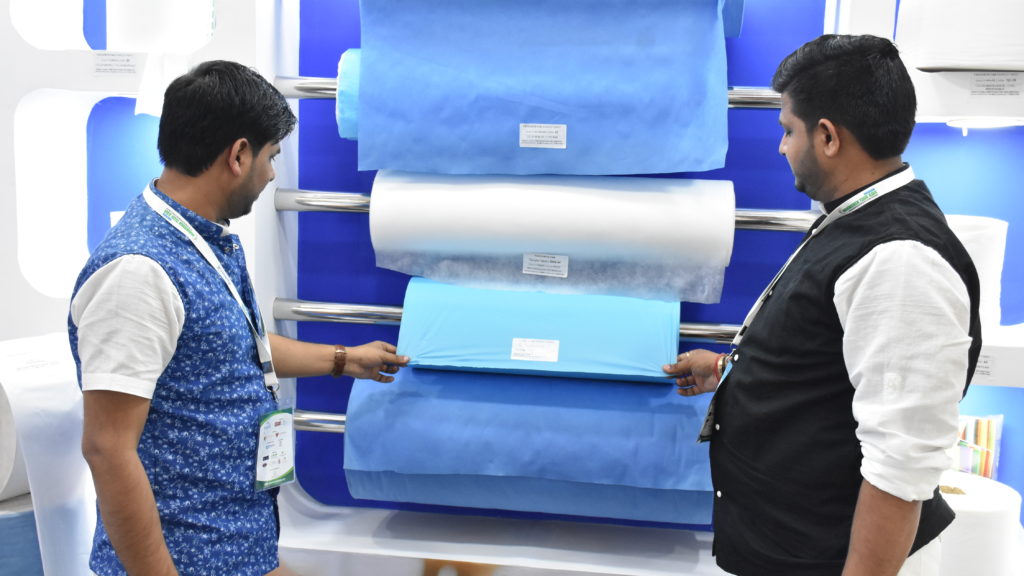
We offer various types of non woven bandages, including rolls for securing larger dressings and ready-made adhesive strips. This guide focuses on the roll format, which gives you maximum control.
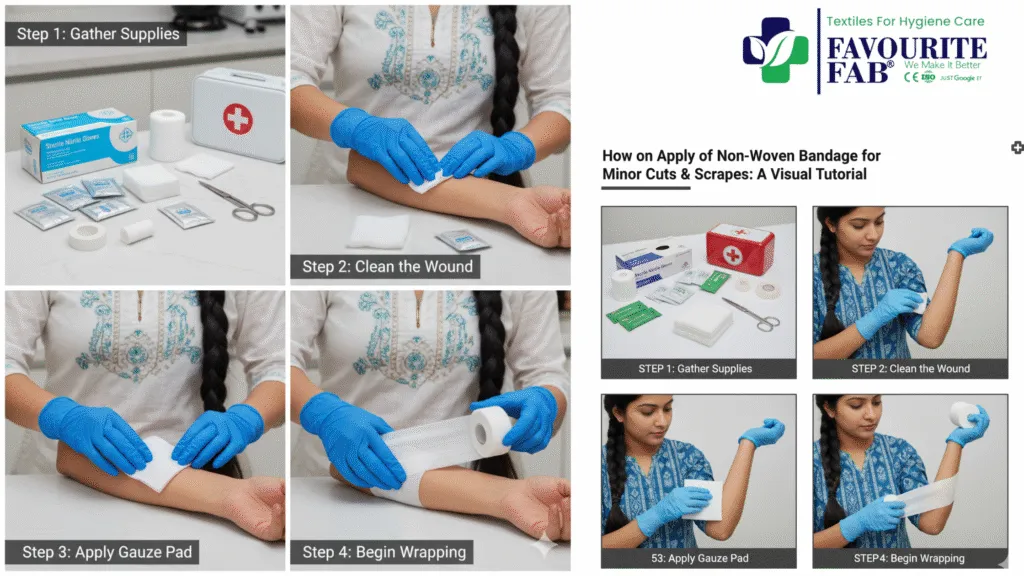
Step-by-Step Non Woven Bandage Application
This visual tutorial provides the simple non woven bandage instructions you need. Always remember to prioritize hygiene before you begin the first aid bandage application.
Phase 1: Preparation and Cleaning
The success of dressing wounds with non woven material depends heavily on a clean start.
Step 1: Hand Washing
Wash your hands thoroughly with soap and water. Afterwards, if available, put on disposable gloves. This is the simplest way to prevent introducing bacteria to the wound.
Step 2: Wound Cleaning Before Bandaging
Gently rinse the wound under cool running water. Use a mild soap to clean the surrounding skin. You may also use an antiseptic solution or spray. Next, pat the wound area dry using a sterile gauze pad. Never use cotton wool, because it can leave fibers behind.
Step 3: Assess the Wound
Check for any debris or foreign objects. If the wound is deep, bleeding heavily, or shows signs of wound infection (redness, warmth, pus), seek professional medical attention immediately.
Phase 2: Applying Non Woven Bandage
This stage involves placing the dressing material directly onto the wound. This answers the core question: how to put on non woven bandage.
Step 4: Apply the Primary Dressing (if needed)
For deep or exuding wounds, you must first apply a primary dressing, such as a sterile pad or specialized wound care bandage (e.g., a DMP Dressing or non-adherent dressing). If you are using an adhesive non woven wound dressing with a pad already attached, skip this step.
Step 5: Start the Wrap (The Correct Technique)
If you are using a roll of non woven fabric bandage: Start unrolling the bandage several inches away from the dressing or the intended area. Place the end diagonally below the wound. This ensures a smooth start.
Step 6: How to Wrap Non Woven Bandage
Wrap the bandage in a spiral, upward motion, always moving away from the heart. Overlap each layer of the medical non woven bandage by approximately half the width of the previous layer. Use only enough tension to hold the dressing securely.
Step 7: Checking Tension
How tight should non woven bandage be? The tension should be firm enough to secure the dressing but loose enough not to restrict blood flow. Check the area below the bandage (fingers or toes) for signs of restricted circulation, such as pallor, tingling, or coolness. If you see discoloration or feel throbbing, remove the bandage and reapply it more loosely. This is a crucial step for preventing non woven bandage swelling beneath the wrap.
Step 8: Secure the End
If you are using a self adhesive non woven bandage (cohesive type), simply press the end of the bandage firmly onto the previous layer. If using a standard non-adhesive roll, secure the end with medical tape.
Managing and Changing Your Non-Woven Bandage
Proper long-term care ensures quick healing. This includes knowing how to change non woven bandage and when to do so.
When to Change Non Woven Bandage
You should change the bandage at least once daily, or immediately if it becomes soiled, wet, or loose.
- Can non woven bandage get wet? While some non woven bandage waterproof or water-resistant options exist, most standard non-woven bandages are not designed to be submerged. If it gets significantly wet, change it promptly to prevent bacteria growth.
How to Change Non Woven Bandage
- Gently unwrap or peel off the old bandage.
- Carefully inspect the wound for healing progress or signs of wound infection.
- Repeat the cleaning process (Wound cleaning before bandaging).
- Apply a fresh non woven wound dressing following the steps above.
Frequently Asked Questions (FAQs)
How to apply bandage step by step?
The basic process is: 1) Wash hands and clean the wound; 2) Apply a sterile pad or dressing (if needed); 3) Wrap the area with the non woven bandage application roll, overlapping by half, applying gentle but firm pressure; 4) Secure the end.
How to use a non-woven dressing roll?
To how to use a non-woven dressing roll, you cut the required length of the dressing material and use it to securely cover and adhere a primary pad or dressing to the skin. The material’s flexibility makes it excellent for applying non woven dressing over moving parts.
What is a non-woven bandage?
A non-woven bandage is a medical textile where the fibers are bonded together through non-weaving processes (like heat, chemicals, or water). This results in a softer, more porous, breathable non woven bandage preferred for its gentle, skin-friendly application.
How to use non-woven tape?
To how to use non-woven tape, you typically use it to secure a non-adhesive dressing or gauze pad. Tear the tape to the necessary length (often an easy tear medical tape), and apply it over the edges of the primary dressing onto the clean, dry skin.
Authority and Expertise: Trust Favourite Fab
As a leading non woven fabric bandage manufacturer, Favourite Fab ensures that every roll leaving our facility is of the highest quality—perfect for non woven bandage for burns, non woven bandage for cuts, or general non woven bandage for sprains care. Our products provide the softness, breathability, and reliable fixation required for effective proper bandage technique.
We invite you to trust our expertise for your entire medical supply needs.
Contact Us
Ready to discuss your bulk needs for high-quality medical non woven bandage products?
Email: sale@favouritehub.com WhatsApp: 9528811566
Favourite Fab – Your trusted source for professional medical non-woven solutions.


We Do Business On Trust.Our Nonwoven fabric Business is Built on trust. Trust starts with Transparency.
Mr.Ramniwas Garg Founder Of Favourite Group